Homegrown Woad - Three Ways of Extracting the Elusive Blue Pigment
Woad (Isatis Tinctoria) has formed part of my dye garden this year - it’s been one of the more successful plants in term of germination and resistance to pests. I have planted a patch in one of the raised beds, making sure to mulch and add nutrients to the soil, as I have read that you need to enrich the plants to get the most blue out of this plant.
We’ve had a fairly dry, hot summer, so I had good hopes for a successful woad harvest. As it’s my first year growing and processing this plant, I decided to try a few different methods to extract the blue pigment.
Before I attempted any of the methods below, I wanted to check I had at least a chance of getting some blue. Way back in July, I picked a leaf at random and hammered it into a scrap of cotton calico using a rubber mallet. This method is sometimes referred to as hapazome - a phrase that was coined by India Flint and literally means ‘leaf dye’.
The print created was intitally bright green, but slowly oxidised over days and weeks to a teal blue - a good sign that there was definitely some indigo in the leaves! I decided to wait another month for the plants to mature before starting my experiments, as they were a bit sparse at this point.
Method One: Salt Rub
My first test in August was the salt rub method - as explained by Rebecca Desnos on her excellent blog. This is quite a quick, easy way to get shades of blue using just woad leaves, bog standard kitchen salt and a bit of elbow grease.
I clipped some woad leaves from each plant, weighing 59g in total, then added about 20g of salt and rubbed together using my hands to form a mushy paste. You may have heard that woad has a slightly odd smell, and I can confirm that it does. This method is best done outside if you are sensitive to strong smells!


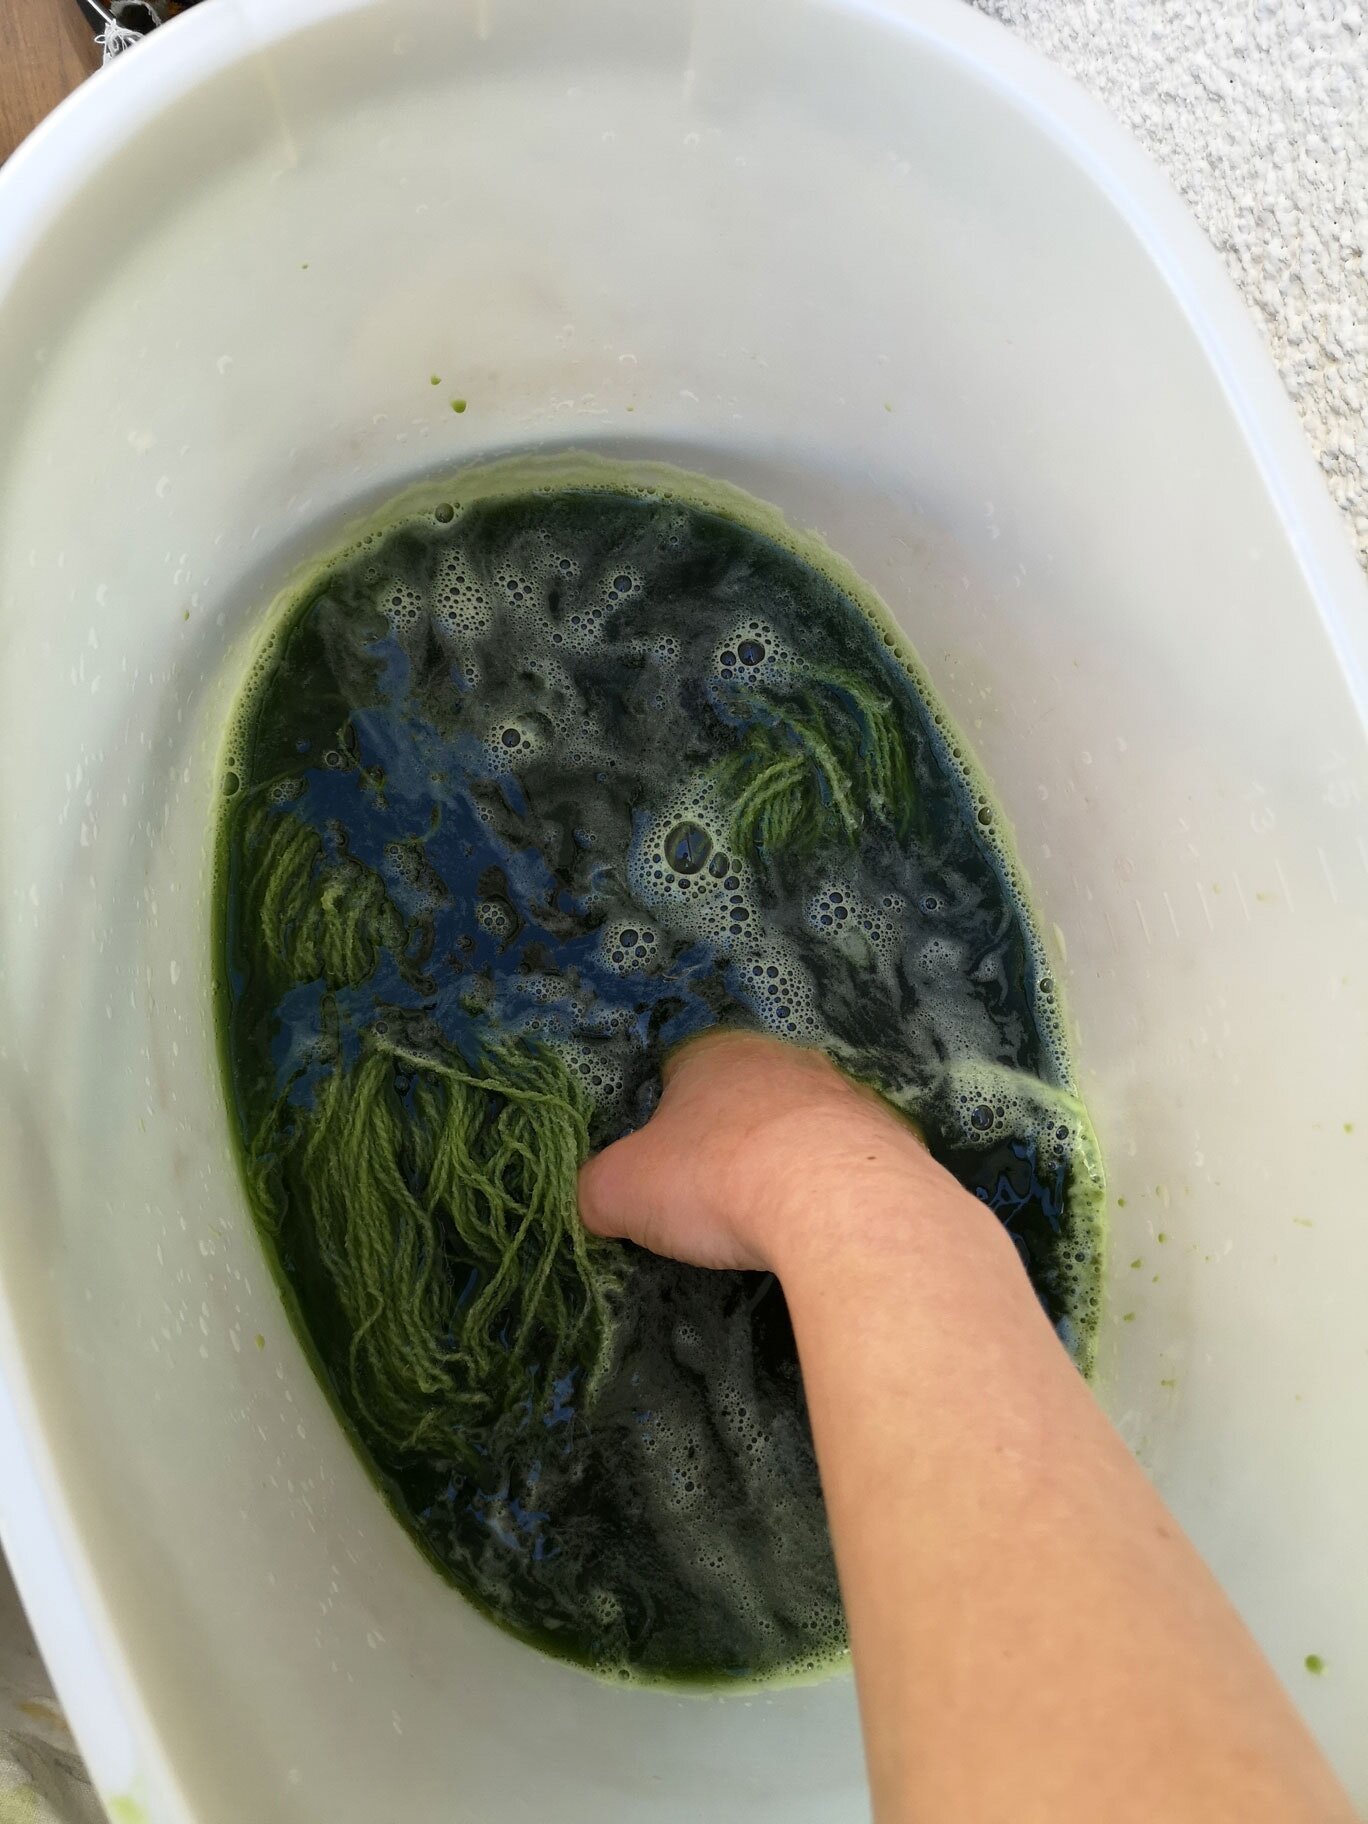
I then added a scoured 25g skein of my Fernhill lambswool yarn - I didn’t use a mordant on the yarn as the indigo-based dyes do not require one. Rubbing the leafy paste into yarn was quite tricky and messy, I was careful not to be too vigorous so as to not felt the yarn.
As you can see in the photos below, the yarn changed from yellow to green, to teal to blue as the leaves were rubbed into the yarn. This is due to the oxidation of the pigment - a similar effect to removing yarn from an indigo vat, only a little slower. The rubbing process took about ten minutes to get the green shade, I then left the yarn outside to continue to oxidise over a couple of hours to eventually get the blue shade.


This was a great way to test the indigo potential of my woad plants. I’m not sure if this method makes the colour light or wash fast, so I will test this. I also think this method may be more suited to cloth rather than yarn, as it’s quite messy and easy to make the yarn tangled and agitated. I doubt that this would be a feasible option for a sweaters quantity of yarn, too!
Method Two: Fresh Leaf Ice Blending
I had seen a few dyers on Instagram acheive wonderful turquoise shades using fresh indigo leaves, and wondered if this method would work with woad too. I used Botanical Colors’ ‘How to Dye with Fresh Indigo’ tutorial as a guide. This experiment was done in September - we’ve had a very hot dry summer this year and the plants looked strong and healthy despite being almost Autumn.
The key to this method is to immediately cool down the leaves as soon as they are picked. I cut a few handfuls of leaves (I forgot to weigh them - whoops!) and plunged them into a bucket of ice water (with extra novelty ice blocks to get the water really cold). The liquid was then blended into a paste and strained back into the bucket, with more a bit more ice added for good measure.
I reserved the pulverised leaf paste for later use, as you can dye with these using standard heat methods.


I dipped 100g of damp scoured wool yarn into the liquid and left for a few minutes before lifting out to see what was happening. The yarn was green and didn’t seem to shift to a blue on oxidising, so I re-dipped the yarn for half an hour. Upon removing the second time the shade was a little darker, so i removed the yarn to oxidise for a while to see what would happen.


I ended up with with a minty green colour with a slight hint of blue - slight toothpaste vibes! It was initially disappointing to use so much of my woad harvest and not get the blue I was hoping for, but in retrospect it’s good to learn from an experiment and try to work out why this didn’t work. I have two theories:
Perhaps this technique simply doesn’t work with woad - the Botanical Colors guide I followed did recommend using Persicaria Tinctoria (Japanese Indigo) for best results.
My woad plants didn’t get enough sun. As the summer progressed, the hollyhocks I had planted behind the woad grew rather tall and leafy, meaning the woad was quite swamped and didn’t get a lot of direct sunlight. I had been quite busy with other projects and had failed to notice that this was happening for a while - once I realised this issue I trimmed the hollyhocks back and staked them out of the way of the woad.
Again, I’m not sure if this method produces a lightfast colour, so I kept the one skein I dyed for myself and knitted one of my snoods with it. I’ve grown to like the minty green colour and it goes with my winter coat pretty well!
Method Three: Pigment Extraction
My final woad experiment was the more traditional method of extracting the pigment. I used the tutorials found on Wearing Woad and All About Woad - these are both great resources. I combined elements from both methods to process my woad leaves and extract the pigment. This was done in September before I went to Shetland as I was worried I would have missed the opportunity if I left it until my return in October!
The indigo pigment starts to degrade as soon as the leaves are picked, so I heated a pan of water up to boiling before picking the leaves. In total I harvested 550g, which were quickly rinsed of any dirt before being added to the vat of hot water. Once all the leaves were added and had wilted to a darker green, I removed the vat from the heat and placed into a sink of cold water to cool down. I have two sinks in my dye room, so I was able to transfer the pan from one lot of cold water to another to assist in the quick cooling of the vat.


Once the vat was cooled, I strained the liquid, reserving the leaves for heating in a dyebath later.
The vat now needed to become alkali - I added washing soda to bring the pH up to about 10. Then it was time to aerate the vat (the opposite of what I knew from preparing vats with pre reduced indigo!). I used a handheld whisk, and after about 20 minutes of whisking began to get annoyed that I didn’t have an electric stick blender! You are supposed to see a blueish tinge to the foam created; mine wasn’t blue but I had noticed some pigment adhere to my whisk -as you can see from where I wiped it on my apron. There must have been some indigo in the leaves, at least!


After a further hour of intermittent aerating, I left the vat to settle out. I then got really busy preparing for my trip to Shetland and completely forgot about the vat until I returned in October…
Realising I should probably deal with the massive pan taking up space in the dye room, I carefully skimmed off the clear water on top and poured the remainder into a series of Kilner jars. As the pigment settled within the jars over the next few weeks, I poured the clear liquid away until what was left fit into one jar. The two images below show what the liquid looked like before and after settling.


As I write this post in late December, the pigment is still sitting in the jar, where it will stay until I am brave enough to strain it and make a small vat. There is such a small amount, it feels very precious! I’ll keep you updated when I finally take the plunge.
The woad I planted in the raised bed will go to seed next year, meaning there will be less pigment (but lots of seeds). Next year I am going to put a raised bed in the front garden (a tiny bit of space where the bins live!) that will be solely for woad - the space gets a lot of sun in the morning and doesn’t have anything obstructing it. I’m also hoping to get a bit of someone’s allotment or garden to try growing indigo - the Persicaria Tinctoria variety can grow well in the UK climate, apparently! I learnt a lot from my first year growing this historic dye plant, and am hoping to use this knowledge to give me greater success next year.
If you’ve enjoyed reading this blog and found it helpful, why not buy me a virtual coffee on Ko-Fi? There’s no obligation, but your support will help me continue to write these blogs and help me continue my natural dye journey. Ria :)